masrawy Posted April 11, 2017 Report Share Posted April 11, 2017 I'm interested in exploring cinemagraph & parallax effect in PTE!! Thanks Sami Quote Link to comment Share on other sites More sharing options...
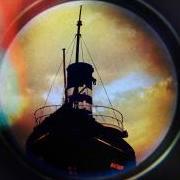
Lin Evans Posted April 11, 2017 Report Share Posted April 11, 2017 Hi Sami, The easiest way to create a parallex effect with PTE is to use a jpg as a background image and a PNG with partial transparency as the foreground image. Then by manipulating the PNG image in terms of pan and zoom, the background image is revealed as if it were a live video with the camera position changing. One good way to do this is to start with your own photo of a background with the camera on a tripod. Then move your subject into the frame and shoot again. Next take the image containing your subject into Photoshop or another suitable image editor and "cut out" your subject leaving transparency everywhere else. The place the original photo without the subject as the background and the PNG transparency of the subject as the object on the layer above. Then you can manipulate the motion of one or both to simulate the parallex effect. For cinemagraphs, I either shoot a single frame for the backdrop then without moving the camera shoot a video or I choose a suitable frame for the backdrop from the video and then use a copy of the original or screen captured frame to paint a mask where I want to see action from the video. Paint pure white where you want action and pure black where you want to reveal the motion from the time-lapse or pseudo time lapse video. Use the original frame or screen captured frame as the backdrop with the video running under the mask. You can also take your creation as an MP4 and use a few frames extracted as layers to images in Photoshop to create an animated GIF of this "cinemagraph" Below are two samples. The first a cinemagraph I created last week and below it the animated gif I created in Photoshop. If you don't know how to create an animated gif in Photoshop let me know and I'll make a turorial for you. Lin Quote Link to comment Share on other sites More sharing options...
masrawy Posted April 11, 2017 Author Report Share Posted April 11, 2017 Thanks Lin for explaining both .. I'll have to play little with both methods and see what I can come up with. If I understand masking in PTE it can be JPEG or PNG white reveal and black conceal, what about halftone or transparency. Obviously can't have transparency with JPEG Quote Link to comment Share on other sites More sharing options...
Lin Evans Posted April 11, 2017 Report Share Posted April 11, 2017 About any degree of halftone or transparency can be used as a mask including video, but the footprint filesize is smallest with jpg and since a mask is "usually" pure white and pure black the compression can be quite high without adversely affecting the quality of the mask. Various levels of transparency and colors can be used for different masking effects. Best regards, Lin Quote Link to comment Share on other sites More sharing options...
masrawy Posted April 11, 2017 Author Report Share Posted April 11, 2017 Lin, if I understand it right it is better to use JPEG as a mask in the mask not necessarily pure black and white. I'll try to create some with different degrees of tone/color to see how it affect the image. thanks again for your help Sami Quote Link to comment Share on other sites More sharing options...
Craig Posted April 12, 2017 Report Share Posted April 12, 2017 17 hours ago, Lin Evans said: Hi Sami, The easiest way to create a parallex effect with PTE is to use a jpg as a background image and a PNG with partial transparency as the foreground image. Then by manipulating the PNG image in terms of pan and zoom, the background image is revealed as if it were a live video with the camera position changing. One good way to do this is to start with your own photo of a background with the camera on a tripod. Then move your subject into the frame and shoot again. Next take the image containing your subject into Photoshop or another suitable image editor and "cut out" your subject leaving transparency everywhere else. The place the original photo without the subject as the background and the PNG transparency of the subject as the object on the layer above. Then you can manipulate the motion of one or both to simulate the parallex effect. For cinemagraphs, I either shoot a single frame for the backdrop then without moving the camera shoot a video or I choose a suitable frame for the backdrop from the video and then use a copy of the original or screen captured frame to paint a mask where I want to see action from the video. Paint pure white where you want action and pure black where you want to reveal the motion from the time-lapse or pseudo time lapse video. Use the original frame or screen captured frame as the backdrop with the video running under the mask. You can also take your creation as an MP4 and use a few frames extracted as layers to images in Photoshop to create an animated GIF of this "cinemagraph" Below are two samples. The first a cinemagraph I created last week and below it the animated gif I created in Photoshop. If you don't know how to create an animated gif in Photoshop let me know and I'll make a turorial for you. Lin Lin, your time lapse cinemagraphs are entrancing and I hope to learn more about Photoshop masking techniques to create similar cinemagraphs from my own photos and videos. Thanks for sharing these fascinating effects! -Craig Quote Link to comment Share on other sites More sharing options...
Recommended Posts
Join the conversation
You can post now and register later. If you have an account, sign in now to post with your account.